Signing In & Uploading Files
Sign in to your client dashboard and submit compliance documents for review.
Overview
Once your email address has been granted access to a property, you can sign in to the client dashboard to upload compliance documents. This tutorial walks through signing in, navigating the dashboard, and submitting files to the correct property.
Need access first? If the property you want to upload to is not yet available on your dashboard, see the Signing In & Accessing Properties tutorial before continuing.
Signing In
Open the Clients Page
Visit the Clients page on our website and choose "Sign In to the Client Dashboard".
Enter Your Credentials
Sign in using the email address that has been granted access, along with your password. If you don't remember your password, use the "Forgot Password" link on the sign-in page to reset it.
Get Oriented on the Dashboard
After signing in you'll land on the Client Dashboard. Along the top of the page you'll see a quick-actions bar with shortcuts to Upload Files, User Management, Your Profile, and the Support Desk. The left sidebar offers the same destinations as a persistent navigation menu.

The quick-actions bar at the top of the Client Dashboard.
Uploading Files
Open the Upload Files Page
Click Upload Files from the quick-actions bar or the left sidebar. The Upload Files page lists every property your email has access to.
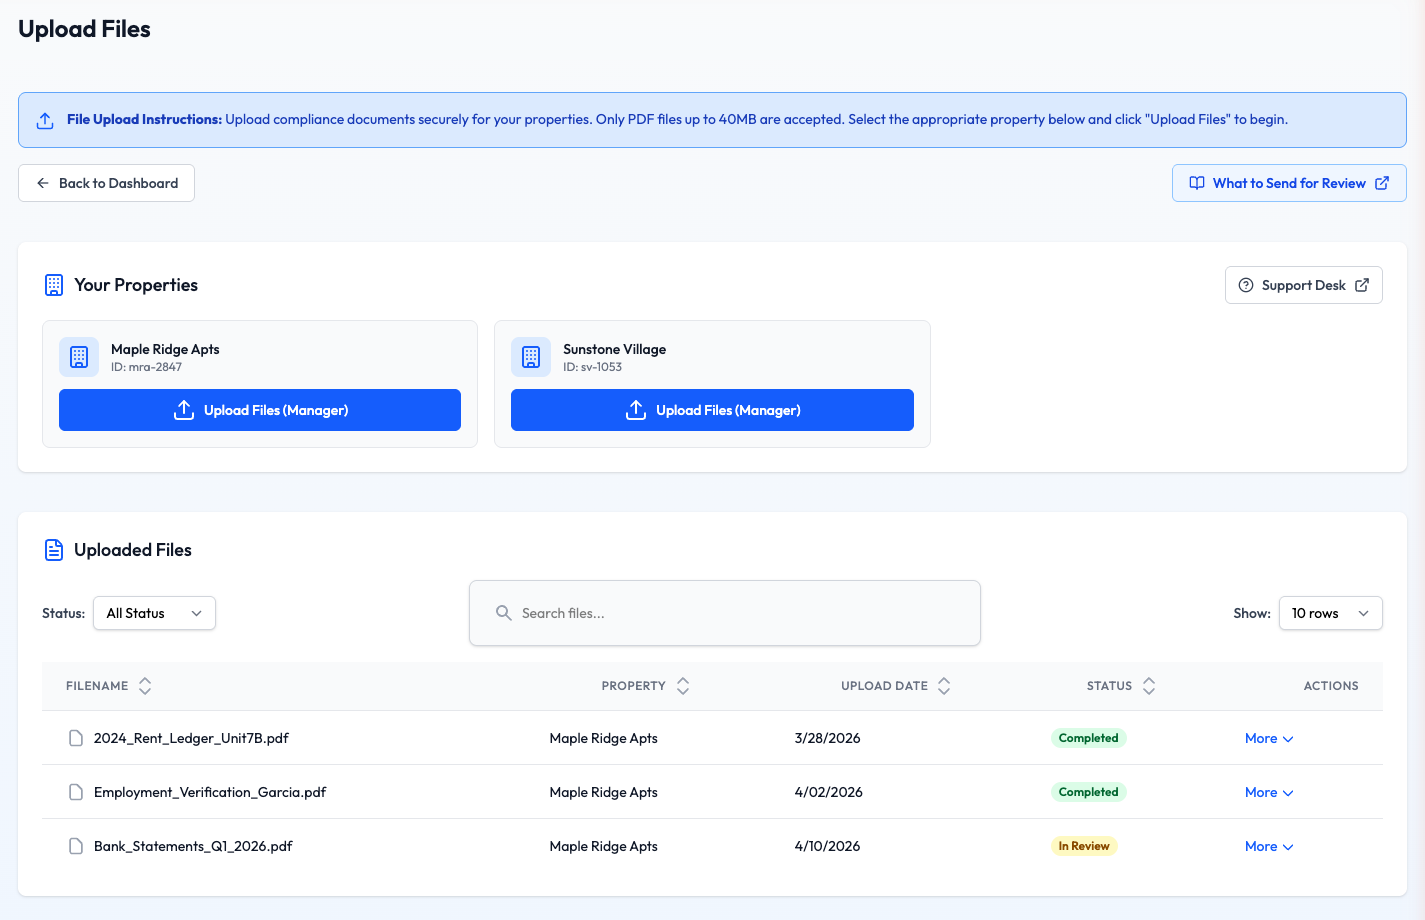
The Upload Files page — each accessible property is shown with its own Upload Files button.
Select the Correct Property
In the Your Properties card, find the property you want to upload files for and click its Upload Files button. Clients with many properties will see a searchable list instead of individual cards — select the property and then click the Upload Files button beneath it.
Read-only access? If your role on a property is Read Only, the upload button for that property will appear disabled with a lock icon. Ask a Manager for the property to grant you Support or Manager access if you need to upload files.
Add Your Files
A window will open for the property you selected. You can either drag and drop files into the upload area, or click inside it to browse your computer. Each file you add appears in the queue so you can review the list before sending.
Start the Upload
Click the upload button to begin. You'll see a progress bar for each file, followed by a confirmation message such as "Successfully uploaded X file(s)" once the upload completes. If a file can't be accepted, a red error banner will tell you why.
You'll see it right away. New uploads appear at the top of the Uploaded Files table with a yellow Pending badge — that's your confirmation that we received the file and it's now in our review queue.
File Requirements
The dashboard enforces a few rules on every upload to keep things moving smoothly:
- PDF files only — no Word documents, spreadsheets, or images.
- Up to 40 MB per file.
- Up to 50 files in a single upload session.
- Descriptive, unique file names help our reviewers find what they need quickly.
Not sure what to send? The What to Send for Review tutorial covers the documents we look for during each type of review.
Tips for a Smooth Upload
Name Files Clearly
- • Include the household or unit name
- • Indicate the document type
- • Add a year if relevant
Protect Your Session
- • Sign out when you're finished
- • Don't share your password
- • Upload from a trusted network
Stable Connection
- • Keep the browser tab open during upload
- • Avoid Wi-Fi drops on large files
- • Retry one file at a time if needed
Add Context
- • Use notes to flag priority files
- • Mention any special circumstances
- • See the Adding Notes to Files tutorial
Troubleshooting
I don't see the property I need to upload to
Confirm you signed in with the exact email that was granted access. If the property still isn't listed, follow the Signing In & Accessing Properties tutorial to request access.
The upload button is disabled
A disabled upload button with a lock icon means your access to that property is Read Only. Ask a Manager for the property to raise your permission level to Support or Manager, or submit a support ticket for help.
My file was rejected during upload
The most common causes are non-PDF formats and files larger than 40 MB. Save or export your file as a PDF and try again. If the PDF is large, check whether it can be flattened or split into smaller documents.
My upload seems stuck
Keep the tab open and check your internet connection. If the progress bar hasn't moved in several minutes, cancel the upload, refresh the page, and try the same file on its own. Persistent problems with a single file are worth a support ticket.